There’s a quiet anticipation in watching yeast dough rest on the counter, slowly expanding under its cover. This crucial stage, known as proofing (or proving), is where much of the magic of bread making happens. It’s the yeast’s time to shine, diligently producing the gases that will transform a dense lump into a light, airy loaf. Yet, for many aspiring bakers, proofing is a source of anxiety. How long should it take? Does it need a warm spot? How can I possibly tell when it’s perfectly ready? The fear of under-proofing (leading to dense bricks) or over-proofing (resulting in collapsed loaves) is real.
But proofing doesn’t have to be guesswork. Like other fundamental baking steps, it’s governed by understandable science and observable cues. By understanding what’s happening within the dough, learning the key factors that influence the process, and mastering reliable ways to gauge readiness, you can approach proofing with confidence. Let’s unravel the secrets to achieving that perfect rise, ensuring you have “proof positive” for your baking success every time.
The Waiting Game: What is Proofing (and Why Does it Matter)?
In the context of yeast-leavened baked goods (breads, rolls, pizza dough, etc.), proofing refers to the dedicated rest period(s) given to the dough after initial mixing and kneading, allowing the yeast to ferment and the dough to rise before baking.
The Science at Work: During proofing, the living yeast cells within your dough are actively consuming the sugars naturally present in the flour (or added to the recipe). Through the process of fermentation, they convert these sugars primarily into:
- Carbon Dioxide (CO2): This odorless, invisible gas is the star leavener here. As yeast produces CO2, the gas bubbles get trapped within the elastic gluten network you developed during kneading. These trapped bubbles inflate, causing the dough to increase in volume – to rise.
- Ethanol and Other Compounds: Fermentation also produces alcohol (which mostly evaporates during baking) and a complex array of organic acids and esters. These byproducts are not just waste; they are crucial contributors to the characteristic flavor and aroma profile of good bread.
Why Proofing is Crucial:
- Volume and Texture: Sufficient proofing time allows the yeast to produce enough CO2 to properly inflate the dough. This creates the open, airy crumb structure and light texture we associate with well-made bread. Insufficient proofing leads to density.
- Flavor Development: The fermentation process takes time. Allowing the dough adequate proofing time enables the yeast and beneficial bacteria (if present, like in sourdough) to generate those complex flavor compounds. Rushing the proofing stage inevitably results in bread that tastes flat or one-dimensional.
It’s important to distinguish yeast proofing from the action of chemical leaveners (baking soda/powder) used in quick breads, muffins, and cakes. Chemical leaveners react quickly upon mixing or heating, producing their gas rapidly. Yeast requires this dedicated resting time (proofing) to perform its biological work.
Two Acts in the Play: Bulk Fermentation vs. Final Proof
Proofing typically occurs in two distinct stages, each serving a slightly different purpose:
Act I: Bulk Fermentation (First Rise)
This is the fermentation period that the entire mass of dough undergoes immediately after mixing and kneading are complete, but before it’s divided and shaped into individual loaves or rolls.
- Purpose: This is where the majority of the yeast activity, CO2 production, and, critically, flavor development takes place. The gluten network, developed during kneading, also matures and relaxes during this stage, becoming more extensible (easier to shape later). Enzymatic activity further breaks down starches, making more sugars available for the yeast and contributing to flavor and crust color.
- Typical Goal: Traditionally, recipes often say to let the dough rise until “doubled in size.” While this is a useful visual benchmark, it’s not always precise. Factors like dough hydration and type affect potential volume increase. More importantly, the dough should feel airy and full of gas, and show signs of active fermentation. This stage can last anywhere from 1 to 3 hours at room temperature, or much longer (8-24+ hours) if the dough is retarded (chilled) in the refrigerator.
- Techniques During Bulk: For certain doughs, especially wetter ones, bakers perform sets of “stretch and folds” during the bulk fermentation period to help further strengthen the gluten structure gently.
Act II: Final Proof (Second Rise / Proofing / Proving)
This is the fermentation period that the shaped dough (loaves in pans, free-form boules in bannetons, individual rolls on a tray, etc.) undergoes after shaping and just before it goes into the oven.
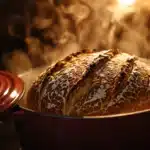
- Purpose: Shaping the dough inevitably compresses and expels some of the gas built up during bulk fermentation. The final proof allows the yeast time to produce more CO2 and re-inflate the dough structure within its final shaped form. This creates the final lightness and ensures good “oven spring” (the rapid initial rise when the dough hits the hot oven).
- Typical Goal: The dough should increase significantly in volume again, often by 50% to 100% (though rarely a full doubling from the shaped size), looking visibly puffy and full of air. This stage is usually shorter than bulk fermentation, perhaps 30 to 90 minutes at room temperature, but timing is critical. Correctly judging the end of the final proof is crucial for the bread’s final volume, crumb structure, and appearance.
Setting the Stage: Factors Influencing Proofing
Proofing isn’t just about waiting for a timer to go off. Several environmental and dough-related factors significantly influence how quickly and how well your dough proofs:
- Temperature (The Accelerator): This is the single most influential factor. Yeast activity is highly sensitive to temperature.
- Warmer temperatures (ideal range often cited as 75-80°F / 24-27°C) significantly speed up fermentation and proofing.
- Cooler temperatures slow yeast activity down dramatically. This isn’t necessarily bad; slow fermentation (retardation) is often used deliberately to develop more complex flavors.
- Consistency is key. Drastic temperature fluctuations can stress the yeast. Aim for a stable proofing environment.
- Humidity (Keeps Skin Supple): Yeast dough needs a reasonably humid environment during proofing. If the air is too dry, the surface of the dough will dry out and form a tough crust. This crust physically restricts the dough’s ability to expand properly and can lead to unsightly tears or blowouts during baking.
- Yeast Amount & Activity: Logically, using more yeast will speed up proofing. The type and freshness of the yeast also matter – instant yeast typically works faster than active dry, and fresh yeast can be very vigorous. Expired or improperly stored yeast will be sluggish or inactive.
- Dough Ingredients:
- Enriched Doughs: Doughs high in sugar, fat, eggs, or dairy (like brioche, challah, cinnamon rolls) often proof more slowly. Sugar competes with yeast for water, and fat can coat yeast cells, slowing fermentation.
- Whole Grains: Whole wheat flour contains bran, which can slightly impede gluten development and affect proofing times compared to white flour doughs.
- Hydration: Wetter doughs sometimes ferment more quickly as yeast can move more freely.
- Dough Handling: How much you handle or “degas” the dough during shaping can impact the final proof time. A tightly shaped loaf might need slightly longer to re-inflate than one handled more gently.
Creating the Perfect Proofing Environment
You don’t necessarily need specialized equipment to create a good proofing environment at home. The goal is gentle, consistent warmth and sufficient humidity.
Finding Gentle Warmth:
- Oven with “Proof” Setting: If your oven has this feature, it’s designed to maintain an ideal low temperature (usually 85-100°F / 29-38°C). Be mindful it might be slightly warmer than the ideal 75-80°F range, potentially speeding things up.
- Oven with Light On: Turn only the oven light on (leave the oven off!). The heat from the bulb can create a gently warm environment. Place the dough inside. Monitor the temperature with an oven thermometer if possible, as it can sometimes get too warm. Crack the door if needed.
- Warm Spot in the Kitchen: Near (but not directly on!) a warm radiator, on top of the refrigerator (where waste heat rises), or in a consistently warm, draft-free corner. Avoid placing dough in direct, hot sunlight, which can overheat parts of it unevenly.
- Microwave Method: Boil a cup of water in the microwave for a minute or two to create steam and warmth. Carefully remove the cup of hot water. Place your covered dough inside the microwave and close the door. The trapped warm, moist air creates a temporary proofing box.
- Room Temperature: Proofing at a standard cool room temperature (around 70°F / 21°C) is perfectly fine! It will simply take longer than proofing in a warmer spot. Many bakers prefer this slower pace for better flavor development. The key is consistency.
- Proofing Box (Advanced): Dedicated appliances or homemade setups that maintain precise temperature and humidity control.
Ensuring Humidity (Preventing a Dry Crust):
- Cover Tightly: Always cover your proofing dough snugly. Options include:
- Plastic wrap (lightly oiled if dough might touch it).
- A reusable food-grade shower cap (fits nicely over bowls).
- A clean, damp (not soaking wet) kitchen towel draped over the bowl or pan.
- Placing the bowl inside a large, clean plastic bag.
- Add Steam: If using the oven or microwave methods, the trapped steam from the hot water helps maintain humidity. For room temperature proofing, simply covering well is usually sufficient unless your environment is exceptionally dry.
The Moment of Truth: How to Tell When Dough is Perfectly Proofed
This is where observation and touch become more important than timers or precise volume measurements, especially for the final proof before baking.
1. Visual Cues:
- Significant Volume Increase: The dough should look noticeably larger, puffier, lighter, and airier than when you first shaped it. It should appear ‘alive’ and full of gas. For the final proof, this often means an increase of 50% to nearly 100% (it won’t necessarily double rigidly like in bulk).
- Smooth, Domed Surface: The surface should generally be smooth and gently domed. You might see small gas bubbles just beneath the surface ‘skin’ of the dough. It shouldn’t look tight and dense, nor should it look overly bubbly, pockmarked, or like it’s starting to sag or collapse.
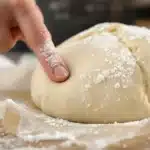
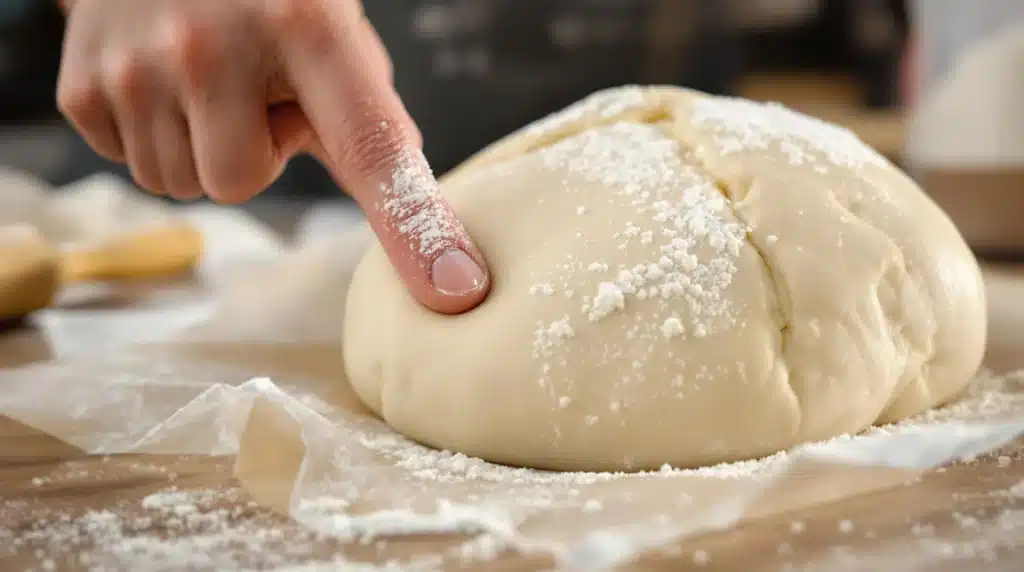
2. The Poke Test (The Go-To Indicator for Final Proof): This simple tactile test is the most reliable way to gauge the balance between gas production and gluten strength in the final proof.
- How to: Lightly flour one fingertip.
- Press: Gently but firmly press your floured fingertip into the side of the proofing loaf, about half an inch (1 cm) deep.
- Observe: Carefully watch how the indentation behaves:
- Indentation Springs Back Immediately & Completely: The dough is UNDER-PROOFED. The gluten structure is still too strong and tight, not yet filled sufficiently with gas. It needs more proofing time.
- Indentation Springs Back Slowly and Only Partially, Leaving a Slight Dent: This is the sweet spot! The dough is PERFECTLY PROOFED and ready to bake. There’s enough gas for a good rise, but the gluten still has strength and elasticity for good oven spring.
- Indentation Stays In Completely; Dough Feels Overly Soft or Deflated: The dough is OVER-PROOFED. The yeast has produced too much gas, and the gluten structure has weakened and stretched too far, losing its elasticity. Bake it immediately, but expect diminished oven spring and potentially a collapsed structure.
3. The Jiggle Test: Gently nudge or wiggle the pan, proofing basket (banneton), or countertop where the dough is resting.
- Perfectly proofed dough should have a slight ‘jiggle’ to it, like a soft gelatin, indicating it’s full of gas but still has structure.
- Under-proofed dough will feel firm and solid.
- Over-proofed dough might look fragile and could potentially deflate or collapse with movement.
Learning to combine these cues – volume increase, surface appearance, and especially the poke test – is key to consistently hitting the proofing sweet spot.
The Perils of Proofing: Under vs. Over
Misjudging the proofing time can significantly impact your final bread.
Under-proofing:
- Causes: Insufficient proofing time; proofing environment too cold; inactive yeast.
- Signs: Dough feels dense; poke test springs back fast; didn’t rise much.
- Baked Result: Often results in poor volume and a dense, tight crumb. The crust might tear or burst open dramatically in one spot during baking (“explosive oven spring”) as the limited, tightly held gas rapidly expands. The crust color might also be pale.
Over-proofing:
- Causes: Proofing too long; proofing environment too warm; using too much yeast.
- Signs: Dough looks overly inflated, possibly collapsing; poke test indentation remains fully; may smell strongly alcoholic or sour.
- Baked Result: The weakened gluten structure collapses easily when scored or moved to the oven. Results in poor oven spring (little to no rise in the oven) and a dense, possibly gummy crumb. The loaf might be flat-topped or even sunken. Flavor can be overly sour, and the crust might be pale because the yeast consumed most available sugars needed for browning.
Which is worse? While neither is ideal, slight under-proofing is often considered more salvageable than significant over-proofing. Under-proofed dough still has rising potential in the oven, whereas over-proofed dough has already passed its peak structural integrity. Aim for perfect proofing, but if unsure, leaning slightly towards under-proofed is often the safer bet for achieving some oven spring.
A Note on Cold Proofing (Retardation)
Many artisan bread recipes utilize cold proofing, or retardation. This involves proofing the dough (usually during bulk fermentation, or sometimes the final proof) slowly in the refrigerator (typically 38-50°F / 3-10°C).
- Benefits: Slowing down the yeast allows enzymes more time to break down starches into complex sugars and allows bacteria (especially in sourdough) to produce more flavorful acids. This results in a deeper, more complex flavor profile. It also offers scheduling flexibility, allowing you to mix dough one day and bake it the next.
- Process: Requires much longer proofing times (anywhere from 8 to 48 hours or more). Dough must be covered well to prevent drying out. Depending on the recipe and duration, the dough might need some time to warm up slightly at room temperature before baking.
Conclusion: Patience, Observation, Proof Positive
Proofing is the quiet, crucial interlude where yeast breathes life into your dough, developing the volume, texture, and flavor that define great bread. It’s not just about letting the dough sit; it’s about providing the right conditions (consistent temperature and humidity) and, most importantly, knowing when the yeast has done its work perfectly.
Mastering proofing comes down to understanding the difference between bulk fermentation and the critical final proof, recognizing the factors that influence yeast activity, and learning to read the dough’s cues. Move beyond relying solely on timers or the vague “doubled in size” instruction. Practice observing the volume and surface texture, and make the poke test your most trusted ally in judging the readiness of the final proof. While under- and over-proofing can happen, understanding their causes and consequences helps you avoid them.
Embrace the patience required for proofing. Use the waiting time to anticipate the beautiful loaf to come. By combining knowledge with careful observation, you’ll soon be achieving “proof positive” results – consistently light, flavorful, and perfectly risen bread that reflects your growing baking skills.