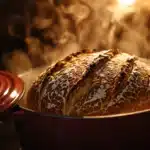
One of the defining glories of a truly magnificent loaf of artisan bread is its crust. Imagine the sound – that satisfying subtle crackle as the loaf cools on the rack. Picture the appearance – deeply caramelized hues ranging from golden brown to rich mahogany, perhaps adorned with beautiful blisters, promising a thin, crisp shell yielding to a tender interior. Achieving this “perfect” crust at home, however, can often feel like chasing a baker’s unicorn. Why do some loaves emerge from the oven with a pale, soft, or overly thick crust, while others boast that coveted shatteringly crisp, beautifully colored exterior?
The truth is, that perfect crust isn’t accidental; it’s the result of several key factors working in harmony during the baking process. It’s about understanding the interplay of steam, heat, dough properties, and cooling. Aspiring artisan bakers who learn to manage these elements can effectively “crack the crust code” and consistently produce loaves with exteriors that are as impressive as their interior crumb. Let’s explore the secrets to achieving crust perfection.
The Anatomy of a Great Artisan Crust
Before we dive into techniques, let’s define what we’re aiming for when we talk about an ideal artisan bread crust (specifically for lean doughs like sourdough, baguettes, ciabatta):
- Thin and Crisp: The crust should provide a distinct textural contrast to the soft crumb. It should break cleanly, perhaps even shatter slightly when cut or bitten into, rather than feeling tough, leathery, or overly chewy.
- Deeply Colored: A rich palette of golden brown to deep reddish-brown or mahogany indicates successful Maillard reactions and sugar caramelization, which contribute significantly to flavor. Paleness suggests under-baking or issues with fermentation/steam.
- Crackly / Blistered (Often Desirable): Many prize a crust with small, fine blisters or a surface that develops tiny cracks as it cools (the “singing” loaf). This is often associated with good, long fermentation (especially cold proofing) and effective steaming.
- Flavorful: The browning processes create unique, slightly nutty, toasted, and caramelized flavor compounds that are distinct from the crumb’s flavor.
Code Cracker #1: The Transformative Power of Steam
We’ve touched on steam before (Oven Insights, Dutch Oven articles), but its role is so crucial for crust development that it deserves top billing here. Steam, applied intensely during the first 10-20 minutes of baking, works wonders:
- Delays Crust Formation for Maximum Rise: Steam keeps the surface of the dough moist and pliable for a longer period as it enters the hot oven. This delay in crust setting allows the loaf to expand dramatically during oven spring without being restricted by a prematurely hardened exterior. More oven spring = lighter loaf, potentially more open crumb.
- Gelatinizes Surface Starches for Shine & Crispness: The moist heat from the steam causes the starch granules on the dough’s surface to absorb water and swell (gelatinize). Later in the bake, after the steam source is removed, these gelatinized starches dry out and harden into a very thin, brittle, glassy layer. This layer is what contributes significantly to the desirable shine and crispness of a well-baked artisan crust. Without sufficient initial steam, this gelatinization doesn’t happen effectively, often leading to a duller, thicker, less crisp crust.
Achieving Effective Steam at Home (Recap):
- Dutch Oven / Combo Cooker: Still the easiest and most reliable method, trapping the dough’s own moisture.
- Steam Pan: A preheated metal pan (cast iron, old broiler pan) on a lower rack, into which hot water or ice cubes are carefully added immediately after loading the bread. Creates a powerful initial burst of steam. (Safety first!).
- Clay Baker / Bread Cloche: Functions similarly to a Dutch oven, trapping steam.
- Lava Rocks / Stainless Steel Chains (More Advanced): Placing these in a pan and adding water creates intense, sustained steam. Requires careful handling.
- Spray Bottle: Offers minimal, short-lived steam; generally insufficient for dramatic crust effects.
Crucial Point: Venting the Steam: Steam is only beneficial during that initial oven spring phase. After 15-25 minutes (depending on loaf size and recipe), you must allow the steam to escape by removing the Dutch oven lid, removing the steam pan, or opening oven vents slightly (if applicable). This allows the crust surface to dry out thoroughly, which is necessary for it to become truly crisp and achieve deep color. Baking in a steamy environment for the entire duration results in a pale, damp, leathery crust.
Code Cracker #2: High Heat & Effective Heat Transfer
Temperature and how it reaches the dough are fundamental to crust formation.
- Initial High Heat: Most artisan lean breads are baked at high initial temperatures (450°F / 230°C or even higher). This intense heat contributes to:
- Rapid Oven Spring: Encourages maximum expansion before the crust sets.
- Quick Crust Setting (After Steam): Helps solidify the loaf’s structure once oven spring is complete.
- Effective Browning: Kickstarts the Maillard reaction and caramelization processes needed for color and flavor development. Some recipes call for reducing the temperature after the initial high-heat phase to ensure the interior cooks through without burning the crust.
- The Baking Surface (Conduction is Key): Baking directly on a thoroughly preheated surface is vital for a well-baked bottom crust.
- Baking Stone or Steel: These heavy items absorb and store significant heat, transferring it intensely and directly to the bottom of the loaf. This promotes good oven spring and ensures a crisp, browned bottom crust, preventing the dreaded pale or soggy bottom. They mimic the hearth of a professional deck oven. (Allow 45-60+ minutes preheating).
- Preheated Dutch Oven Base: Acts just like a baking stone in providing powerful bottom heat.
- Standard Baking Sheet (Cool or Thin): Transfers heat much less effectively, often resulting in a paler, softer bottom crust compared to loaves baked on stone, steel, or in a Dutch oven.
- Oven Type:
- Convection (Fan On): The circulating hot air promotes faster drying of the surface after the initial steam phase, leading to potentially quicker browning and enhanced crispness all around the loaf. May require slightly lower temperature settings.
- Conventional (Fan Off): Relies more on radiant heat. Excellent crusts are absolutely achievable, especially when combined with effective steaming and a good baking surface (stone/steel/Dutch oven).
Code Cracker #3: Dough Properties & Fermentation
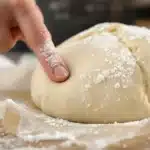
The characteristics of your dough itself play a significant role in the crust it develops.
- Hydration Level: As discussed in Hydration Hype, higher hydration doughs (wetter doughs) tend to produce more internal steam during baking. This can contribute to a thinner, crispier crust and often enhances blistering. Lower hydration doughs might naturally produce thicker, chewier crusts.
- Fermentation Quality: A well-developed fermentation process is key for crust color and potential blistering.
- Flavor & Color Precursors: Proper fermentation develops the complex sugars and amino acids on the dough’s surface that are necessary fuel for the Maillard reaction and caramelization, leading to deep, rich color and flavor.
- Residual Sugars: If dough over-proofs, the yeast may consume too many of the available surface sugars, resulting in a pale crust that refuses to brown well, even if baked correctly otherwise.
- Blistering: Those desirable small blisters on the crust are often attributed to good fermentation activity creating small gas pockets near the surface, combined with effective steaming. Cold fermentation (retardation) frequently enhances blistering, as the slow fermentation develops more complex gases and acids near the dough’s skin.
- Enrichments (Fats, Sugars, Dairy): Lean doughs (flour, water, salt, yeast/starter) develop the crispest, crackliest crusts. Adding fats (like butter or oil), significant amounts of sugar, or dairy products tends to soften the crust while promoting faster browning. These ingredients interfere with crust crisping but add richness and tenderness.
Code Cracker #4: Finishing Touches & Proper Cooling
What happens in the last few minutes of baking and immediately after can make or break your crust’s texture.
- Venting the Oven (Optional): Some bakers like to turn off the oven for the last 5-10 minutes of baking and crack the oven door slightly open. The idea is that the drier air helps draw out remaining moisture from the crust, making it even crispier. Use this technique cautiously, as it can also cool the oven too quickly depending on the oven and recipe.
- Egg Washes (Not for Lean Artisan Crusts): While egg washes or milk washes create shine and deep color on enriched breads, rolls, and pastries, they produce a softer crust and are generally not used when aiming for the thin, crisp, crackly crust of lean artisan loaves. Steam and heat alone create the desired finish for these breads.
- COOLING IS CRUCIAL: This step is as important for crust texture as the baking itself! As soon as the bread comes out of the oven (or Dutch oven), immediately transfer it to a wire cooling rack.
- Why? Air circulation all around the loaf is essential. As bread cools, moisture inside the loaf migrates outwards towards the drier crust. If the loaf sits on a solid surface, this moisture gets trapped underneath, turning the bottom crust (and eventually the whole crust) soft and soggy. The wire rack allows this moisture to dissipate into the air.
- Listen for the “Crackle”: That wonderful singing or crackling sound a hot loaf makes as it cools is the sound of the crust contracting slightly faster than the cooling interior crumb, creating tiny fissures. It’s a direct indicator of a well-baked, crisp crust!
- Patience Before Slicing: Resist the urge to cut into piping hot bread! The internal structure is still setting, and slicing too early releases steam, potentially leading to a gummy texture. Letting it cool completely (at least 1 hour, often 2-3 for large loaves) allows moisture to redistribute and the crust to fully develop its texture.
Troubleshooting Common Crust Issues
- Crust Too Pale: Oven temp likely too low (check with thermometer!). Not baked long enough? Dough possibly over-proofed (sugars depleted)? Insufficient steam during the initial baking phase?
- Crust Too Dark / Burnt (Especially Bottom): Oven temp likely too high? Baking surface too close to the bottom heating element? Using a very dark baking pan? Baked too long? Try lowering the oven rack or placing an empty baking sheet on the rack below your baking surface to deflect some direct heat.
- Crust Too Thick & Tough: Often caused by insufficient steam during the initial bake (crust set too early). Could also be from baking too long at too low a temperature after the initial high heat phase, or potentially dough hydration was too low.
- Crust Soft or Soggy (Not Crisp): Usually caused by insufficient baking time (interior moisture too high), not venting steam properly after the initial phase, or improper cooling (not using a wire rack). High ambient humidity during cooling can also contribute.
- No Blisters / No Crackle: Could indicate under-developed fermentation, lack of cold proofing (which enhances these), or insufficient initial steam intensity.
Conclusion: Mastering Your Crust
Achieving that perfect artisan bread crust – thin, crisp, deeply colored, flavorful, and maybe even beautifully blistered – isn’t about a single secret trick. It’s about understanding and orchestrating several key factors throughout the baking process. It requires creating intense steam during the initial bake to maximize rise and prepare the surface, utilizing high heat and an effective baking surface for proper browning and cooking, ensuring well-fermented dough with available sugars, and, critically, allowing the baked loaf to cool completely on a wire rack to preserve its crispness.
By paying attention to these elements, experimenting with steam methods, ensuring your oven temperature is accurate, perhaps investing in a baking stone or Dutch oven, and mastering proper cooling, you can reliably crack the crust code. Soon, you’ll be pulling loaves from your oven that not only taste incredible but also boast that picture-perfect, shatteringly crisp exterior that is the hallmark of true artisan bread.