For many aspiring bakers, the image of kneading dough – that rhythmic sequence of pushing, folding, and turning – is synonymous with the romance of bread making. It seems fundamental, almost mystical. But what’s actually happening during this process? Is it just about mixing ingredients, or is there more to it? Why do some recipes call for ten minutes of kneading, while others suggest stretching and folding over hours? And the ultimate question for beginners: how do you know when you’ve done it enough, or perhaps too much?
Kneading can seem intimidating, a physical task shrouded in mystery. But fear not! While there’s certainly an “art” or feel that develops with practice, kneading is deeply rooted in science – specifically, the science of gluten development. Understanding why we knead and learning to recognize the physical cues of well-developed dough transforms kneading from a chore into a crucial, controlled step in creating beautiful, well-structured bread. This guide will delve into the science behind the stretch, explore various kneading techniques, and reveal the secrets to knowing exactly when your dough is perfectly kneaded, blending know-how with intuition.
The Science Behind the Stretch: Why We Knead
To understand kneading, we first need to revisit gluten. As we learned when discussing flour, gluten is an elastic network formed when two proteins naturally present in wheat flour – glutenin and gliadin – come into contact with water. Simply mixing flour and water begins this process, hydrating the proteins and allowing them to start bonding. However, at this initial stage, the gluten network is weak, tangled, and disorganized. The dough feels shaggy, sticky, and lacks strength.
This is where kneading comes in. Kneading is the physical manipulation of dough to develop that haphazard protein arrangement into a strong, orderly, and elastic gluten network. Here’s what kneading accomplishes:
- Develops Gluten Structure: The primary goal! The stretching and folding actions align the gluten proteins (long strands of glutenin cross-linked by gliadin) into a more parallel structure, forming longer, stronger, more elastic sheets and strands. Think of it like combing tangled threads into a smooth, stretchy fabric.
- Incorporates Air: The folding action traps small pockets of air within the dough. These tiny bubbles serve as nucleation sites – starting points for the larger bubbles of carbon dioxide gas that the yeast will produce during fermentation.
- Distributes Ingredients Evenly: Kneading ensures the yeast, salt, sugar, fat (if any), and water are uniformly distributed throughout the dough. This allows the yeast consistent access to food and ensures even fermentation and flavor. Salt, crucial for flavor and controlling fermentation, also needs to be evenly dispersed.
- Strengthens and Conditions the Dough: The process builds elasticity (the ability to spring back) and extensibility (the ability to stretch without tearing). A well-developed gluten network is strong enough to trap the CO2 produced by the yeast, allowing the dough to rise significantly without collapsing, and providing the characteristic chewy texture of bread.
Consequences of Improper Kneading:
- Under-kneading: Results in a weak, underdeveloped gluten network. The dough won’t be able to effectively trap gas. The final loaf will likely have poor volume (dense), a tight and possibly crumbly crumb structure, and may tear easily when shaped.
- Over-kneading: While harder to achieve by hand, it’s possible with a stand mixer. Excessive mechanical action can eventually cause the gluten strands to break down. The dough becomes overly slack, sticky, may lose its elasticity, and can be difficult to handle. The resulting bread might have a weak structure or a gummy texture.
Understanding that kneading is fundamentally about building this crucial gluten structure helps clarify its importance in bread making.
Gearing Up: What You Need
The good news is you don’t need fancy equipment to start kneading effectively.
Essential:
- A Clean Work Surface: A large, sturdy, smooth countertop or a dedicated wooden or plastic baking board works perfectly. Ensure it’s clean and dry before starting.
- Your Hands: The original and arguably best tools for learning the feel of dough. Clean hands are a must!
- Flour (for dusting): Keep a small amount of flour nearby for lightly dusting the work surface and your hands only as needed to prevent excessive sticking. Use it sparingly!
- Dough Scraper (Bench Scraper): While not strictly essential, this inexpensive tool is highly recommended. It’s invaluable for:
- Manipulating sticky dough without using excess flour.
- Folding the dough over itself.
- Cleaning dough bits off the work surface easily.
- Dividing dough portions cleanly.
Optional (but helpful):
- Stand Mixer with Dough Hook: A significant labor-saver, especially for larger batches, enriched doughs (which can be very sticky and require long kneading times), or if physical limitations make hand kneading difficult. Requires careful monitoring to avoid over-kneading.
The Kneading Dance: Techniques Explained
Let’s explore the most common ways to develop that vital gluten network. Learning by hand first is highly recommended, as it builds an intuitive understanding of how the dough transforms.
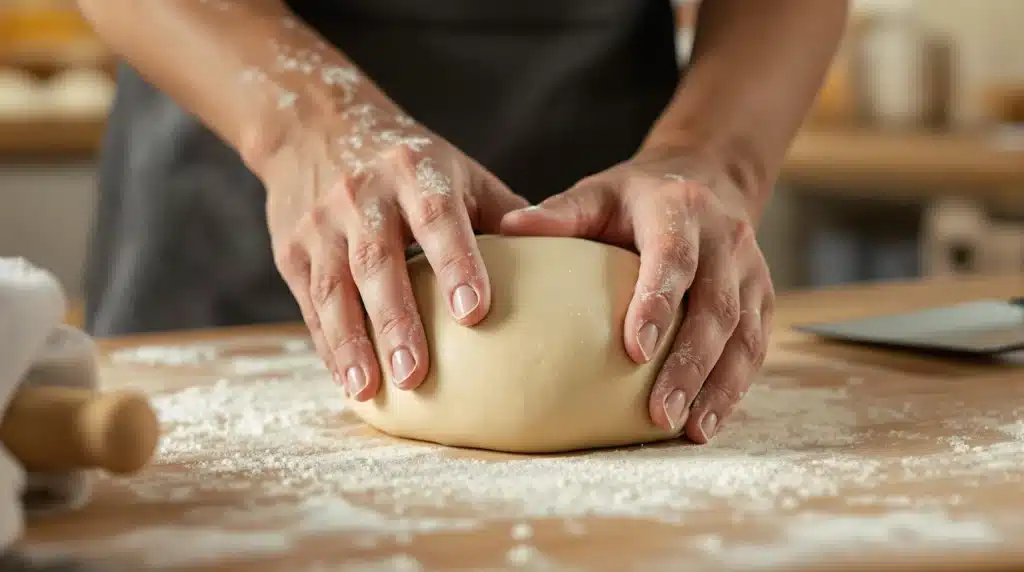
Classic Hand Kneading (Push, Turn, Fold)
This is the most traditional and widely taught method.
- Start: After initial mixing, the dough will be shaggy. Turn it out onto a very lightly floured surface. Lightly flour your hands.
- Form: Gently pat and gather the dough into a rough mound in front of you.
- Push: Using the heel of one hand (or both hands overlapping slightly), push down and firmly roll the dough away from you, stretching the top surface. Put some body weight into it, not just arm strength.
- Fold: Fold the stretched portion of the dough back over itself towards you (fold it roughly in half).
- Turn: Give the dough mass a quarter turn (about 90 degrees).
- Repeat: Continue this rhythmic sequence: Push away, Fold back, Turn.
- Rhythm & Observation: Find a comfortable, steady rhythm. Notice how the dough changes over time. Initially sticky and shapeless, it will gradually become smoother, less sticky, and more elastic. Add the absolute minimum amount of flour to the surface or your hands only if the dough is sticking unmanageably. Trust the process – the dough will become less sticky as the gluten develops. Aim for 10-20 minutes of active kneading, but rely on dough cues (see below) rather than the clock.
Slap and Fold (French Fold / Bertinet Method)
This technique is particularly effective for wetter, stickier doughs (high hydration) that are frustrating to knead conventionally. It develops gluten quickly without incorporating much extra flour.
- Lift: Use a dough scraper and both hands (lightly wet or oiled hands can help) to scrape the very sticky dough mass off the work surface (no flour needed initially!). Lift the entire mass slightly off the counter.
- Slap: Allow the bottom edge of the dough hanging from your fingers to slap down onto the work surface.
- Stretch: As you slap it down, simultaneously stretch the dough upwards and towards yourself, elongating it.
- Fold: Fold the top portion (still in your hands) over the part that slapped onto the counter, trapping air.
- Repeat: Rotate the dough slightly, lift the entire mass again, and repeat the slap-stretch-fold motion.
- Transformation: It will seem incredibly messy and sticky at first! Persist. As the gluten develops (which happens surprisingly quickly with this method), the dough will miraculously become smoother, less sticky, and easier to handle. Often performed for 5-10 minutes, potentially with rests in between.
Stretch and Fold (In the Bowl / Gentle Development)
This less intensive technique is often used for high-hydration doughs (like ciabatta or some sourdoughs) or as part of no-knead or minimal-kneading processes. It develops gluten gently over a longer period, usually during the bulk fermentation (first rise).
- Preparation: Leave the dough in its mixing bowl. Wet your hands slightly with water to prevent sticking.
- Grab & Stretch: Reach into the bowl under one “side” of the dough. Gently grab about a quarter of the dough mass.
- Lift & Fold: Lift that portion straight up, stretching it gently until you feel resistance. Fold it over the top of the main dough mass towards the opposite side of the bowl.
- Rotate & Repeat: Rotate the bowl by 90 degrees (a quarter turn). Repeat the grab-stretch-fold process from this new side.
- Complete Set: Repeat two more times, rotating the bowl each time, so you have performed a total of four stretches and folds (North, East, South, West). This completes one “set” of stretch and folds.
- Rest: Cover the bowl and let the dough rest. Recipes typically call for performing sets of stretch and folds at intervals (e.g., every 30, 45, or 60 minutes) during the first 1-2 hours of bulk fermentation.
Stand Mixer Kneading
Using a stand mixer equipped with a dough hook attachment automates the physical labor.
- Combine: Use the dough hook on the lowest speed initially just to bring the ingredients together into a shaggy mass. Scrape the bowl if needed.
- Knead: Increase the speed to low or medium-low (typically speed 2 or 4 on a KitchenAid – check your mixer’s manual). Avoid high speeds, which can over-oxidize or overheat the dough.
- Monitor Closely: A mixer develops gluten much faster than hand kneading. Don’t just set a timer and walk away. Observe the dough. It should start clearing the sides of the bowl (though very wet doughs might not fully clear the bottom). Stop the mixer periodically to check the dough’s texture and perform the windowpane test (see below).
- Watch for Over-kneading: Signs include the dough becoming excessively sticky and slack again after initially coming together, climbing excessively high up the dough hook, or feeling unusually warm to the touch.
- Time: Kneading time in a mixer is significantly shorter than by hand. While hand kneading might take 15-20+ minutes, a mixer might achieve similar development in 8-12 minutes (this is highly variable depending on the dough, mixer power, and speed). Always rely on the dough’s visual and tactile cues, not just the timer.
Knowing When to Stop: Signs of Properly Kneaded Dough
This is the most critical skill to develop. Timers are only rough guides; the dough tells you when it’s ready. Learn to recognize these key indicators:
- Smooth Texture: The dough transforms from a rough, lumpy, or shaggy mass into one that looks and feels noticeably smoother and more cohesive.
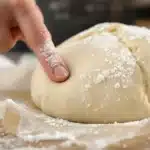
- Elasticity (Spring Back): Gently poke the surface of the dough with a lightly floured finger. If the indentation slowly and gently springs back, the gluten is developing elasticity. If it stays indented, it needs more kneading. If it springs back instantly and forcefully, it might be getting close to over-kneaded.
- Supple & Tacky, Not Sticky: Properly kneaded dough should feel pliable and supple. It might feel slightly tacky to a clean, dry fingertip, but it shouldn’t stick excessively or leave large amounts of residue on your hands. (Very wet doughs will always be somewhat sticky, but should become more manageable).
- Holds Its Shape: The dough should hold together better and can be formed into a rough ball that largely maintains its shape, rather than slumping immediately.
- The Windowpane Test (The Gold Standard): This is the most reliable indicator of sufficient gluten development, especially for standard bread doughs.
- Pinch off a small piece of dough (about the size of a golf ball).
- Hold it with the fingertips of both hands.
- Gently and slowly rotate and stretch the dough outwards from the center, thinning it into a membrane.
- Properly developed dough should stretch thin enough to become translucent – allowing light to pass through, like a stained-glass window – without tearing easily.
- If the dough tears before becoming translucent, it needs more kneading. Continue kneading for another minute or two and test again.
- If the dough feels very slack and tears almost immediately with no resistance, it might be over-kneaded (more likely with a mixer).
Important Caveats:
- Enriched doughs (containing significant amounts of eggs, butter, sugar) often feel softer and stickier and may take longer to reach a strong windowpane.
- Whole wheat doughs, due to the sharp bran particles interfering with gluten strands, may never achieve a perfect, paper-thin windowpane without tearing. Look for significant improvement in elasticity and stretchiness compared to the initial state.
Kneading Considerations & Troubleshooting
- Minimal Flour is Key: The number one mistake beginners make is adding too much flour during kneading to combat stickiness. Resist the urge! Each addition of flour throws off the recipe’s hydration balance, leading to a drier, denser final loaf. Use a bench scraper to lift and fold sticky dough. Only add a tiny dusting of flour if absolutely necessary. Trust that kneading itself will make the dough less sticky.
- Hydration Matters: Wetter doughs (higher hydration) are inherently stickier and require different handling (slap/fold, stretch/fold often work well). They can be challenging but often reward you with a lighter, more open crumb structure. Drier doughs are easier to handle but may result in a denser loaf.
- Dough Temperature: Kneading generates heat through friction. Aim for a final dough temperature (FDT) around 75-80°F (24-27°C) for most yeast doughs, as this promotes ideal fermentation. If using a mixer, check the dough temperature occasionally. If it gets too warm (above 80-82°F), stop the mixer and let the dough rest for a few minutes before resuming.
- Fixing Under-kneaded Dough: If you realize during shaping that your dough feels slack and tears easily, you can try kneading it for a few more minutes, but results may be compromised. Better to aim for proper development initially.
- Dealing with Over-kneaded Dough: This is difficult to fix. Handle the dough very gently during shaping. Expect potential issues with structure or texture. Prevention (especially with a mixer) is the best approach – monitor closely!
What About No-Knead Breads?
You’ve likely heard of popular “no-knead” bread recipes. How do they work without this seemingly crucial step?
- The Concept: No-knead methods rely on time, high hydration, and enzymatic activity to develop the gluten network, rather than intensive mechanical kneading.
- How it Works: A very wet dough (high water content facilitates protein movement and enzyme activity) is mixed briefly and then allowed a long, slow fermentation period (often 12-24 hours, sometimes refrigerated). Over this extended time, enzymes naturally present in the flour break down proteins, and the slow movement and natural folding of the dough as gas bubbles form gradually align the gluten strands. Often, a few sets of gentle stretch-and-folds are incorporated during this period to further encourage structure.
- The Result: Typically yields bread with a very open, irregular, rustic crumb and often a wonderfully crisp crust (frequently baked in a Dutch oven to trap steam). Requires minimal hands-on effort but much more planning and time.
- Kneading vs. No-Knead: They are different paths to delicious bread. No-knead is fantastic for its ease and specific results. However, understanding and mastering traditional kneading provides fundamental control over a wider range of bread styles and textures and builds invaluable dough-handling intuition.
Conclusion: Embrace the Art and Science
Kneading is far more than just busywork; it’s the purposeful development of the gluten structure that gives bread its essential character – its volume, chew, and crumb. It truly is a blend of science (understanding gluten development, hydration, temperature) and art (learning the feel, rhythm, and visual cues of the dough transforming under your hands or hook).
Don’t let kneading intimidate you. Start with a basic recipe, practice the techniques, and focus on learning to recognize the signs of properly developed dough – smoothness, elasticity, and that revealing windowpane. Even if you plan to use a stand mixer eventually, spending time kneading by hand builds an irreplaceable understanding of how dough should feel at each stage. Be patient with yourself and the process. With each batch, your “kneading know-how” will grow, moving you closer to consistently baking loaves with the beautiful structure and satisfying texture you dream of.