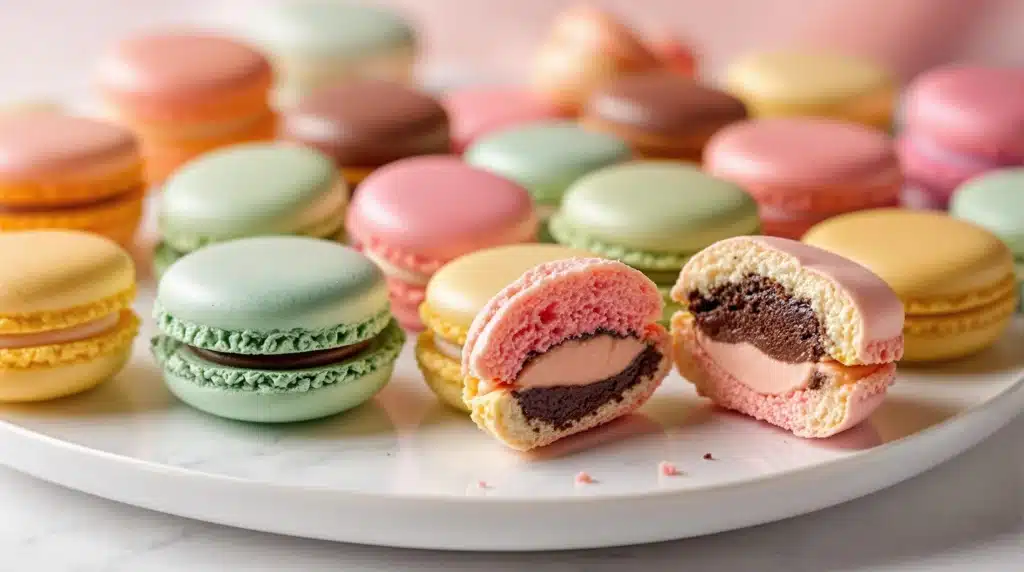
Ah, the French macaron. Those dainty, colorful almond-meringue sandwich cookies, filled with luscious ganache, tangy curd, or silky buttercream, are as visually captivating as they are delicious. They seem almost impossibly elegant, creations of pure pâtisserie magic. Yet, lurking beneath their smooth, delicate shells lies a notorious reputation: macarons are widely considered one of the most challenging and fickle treats for home bakers to master.
Many aspiring bakers embark on the macaron journey full of enthusiasm, only to be met with cracked shells, absent “feet” (that signature ruffled base), hollow interiors, or cookies that spread into flat, disappointing discs. Why are these seemingly simple cookies so temperamental? Success hinges on precision, understanding the role of each ingredient, mastering key techniques like the meringue and the crucial macaronage, and controlling variables like humidity and oven temperature. While challenging, achieving macaron mastery is absolutely possible. This guide will help you tame the fickle French cookie, demystifying the process and setting you on the path to creating beautiful, delicious macarons with confidence.
Anatomy of a Perfect Macaron
Before we start, let’s define our goal. What makes a macaron “perfect”?
- Smooth, Domed Shell: The top surface should be perfectly smooth, shiny (before baking), and gently domed, without any peaks or bumps.
- Well-Developed “Feet” (Pied): The characteristic ruffled ridge around the bottom edge of the shell. This indicates proper rising and drying.
- Crisp Exterior, Chewy Interior: The shell should have a delicate, thin, crisp exterior that yields easily to a soft, slightly dense, chewy almond-meringue interior. It should not be completely hollow or dry and crumbly throughout.
- Uniform Size and Shape: Consistency is key for elegant presentation and even sandwiching.
- Appropriate Filling: Filled generously but neatly with a complementary filling (ganache, buttercream, jam, curd) that has melded slightly with the shell.
The Essential Quartet: Key Ingredients & Their Roles
Unlike many baked goods, macarons rely on a precise balance of just four main ingredients:
- Almond Flour / Almond Meal: This provides the bulk, structure, nutty flavor, and characteristic chewy texture.
- Fine Grind is Crucial: Use finely ground almond flour (often labeled “superfine”) for smooth shells. Coarser almond meal can result in bumpy tops. Sifting is essential to remove larger particles.
- Blanched Preferred: Made from almonds with skins removed, blanched almond flour gives cleaner colors, especially for lighter shells.
- Dryness Matters: Almond flour can absorb moisture from the air. Some bakers lightly toast or dry it in a low oven briefly, or store it airtight, especially in humid climates, to ensure it’s not too damp.
- Confectioners’ Sugar (Powdered Sugar / Icing Sugar): Provides sweetness, helps absorb moisture from the egg whites, and contributes significantly to the formation of the smooth, crisp shell.
- Sifting is Mandatory: Must be sifted, usually together with the almond flour, to remove any clumps which would mar the shell’s surface.
- Cornstarch Content: Most commercial powdered sugar contains a small amount (3-5%) of cornstarch as an anti-caking agent. This can slightly affect the final texture (potentially making shells a tiny bit softer or chewier) compared to pure powdered sugar (which is harder to find).
- Egg Whites: These are the absolute backbone, providing leavening through whipping and structure as their proteins coagulate during baking.
- Fat-Free Zone: Absolutely no trace of yolk or any other fat can be present, as fat inhibits the whites from whipping into a stable meringue. Use clean, grease-free bowls and whisks.
- Aged Egg Whites? Many classic recipes call for “aged” egg whites – whites separated from yolks and left loosely covered in the refrigerator for 1-3 days (or even longer). The theory is that aging allows some moisture to evaporate and slightly breaks down proteins, potentially leading to a more stable meringue that whips up better. However, many successful bakers use fresh egg whites with excellent results. Consistency and ensuring they are at room temperature before whipping are often more critical than aging.
- Room Temperature: Room temp whites generally whip up to a greater volume and more easily than cold whites.
- Granulated Sugar (or Caster/Superfine Sugar): This sugar is crucial for stabilizing the egg white meringue. As it dissolves into the whites during whipping, it strengthens the protein network, making the meringue less prone to collapse and weeping. Finer granulated sugar (caster or superfine) dissolves more readily, which is beneficial. The method of incorporating this sugar defines whether you’re using the French or Italian meringue technique.
Optional additions include a pinch of salt (enhances flavor), cream of tartar (acid that helps stabilize French meringue), powdered egg whites (adds extra protein for stability, especially useful in humid conditions), and food coloring (gel or powder types are highly recommended over liquid coloring, which adds excess moisture).
Meringue Methods: French vs. Italian
The meringue forms the base structure. Two primary methods are used for macarons:
French Meringue Method
- The Process: Room temperature egg whites are whipped to soft peaks. Then, granulated sugar is added gradually, a tablespoon or so at a time, while whipping continues until the meringue reaches stiff, glossy peaks. This means when you lift the whisk, the peak holds its shape firmly, possibly with a slight curl at the very tip, and the meringue looks shiny. The sifted dry ingredients (almond flour/powdered sugar) are then carefully folded into this finished meringue.
- Pros: Simpler technique, requires no special equipment like a candy thermometer, involves fewer steps.
- Cons: The resulting meringue is generally considered less stable than Italian meringue. It’s more sensitive to variations in egg white quality, humidity levels, and the folding process (macaronage). Over-whipping or under-whipping the meringue is a common issue. Results can sometimes be less consistent, especially for beginners or in challenging climates.
Italian Meringue Method
- The Process: This method involves cooking a sugar syrup. Granulated sugar and a small amount of water are heated in a saucepan to the soft-ball stage (typically 235-240°F / 113-115°C), requiring accuracy with a candy thermometer. While the syrup cooks, egg whites (sometimes with a portion of the sugar) are whipped in a separate bowl to soft peaks. Once the syrup reaches the target temperature, it’s poured in a slow, steady stream down the side of the mixing bowl into the whipping whites (with the mixer running on medium speed), avoiding the whisk itself. Whipping continues until the meringue is thick, incredibly glossy, marshmallowy in texture, and has cooled down significantly (bowl feels barely warm). The sifted dry ingredients are then folded in. (Often, a portion of the total egg whites is mixed directly with the dry ingredients into a paste first, and the Italian meringue is folded into this paste).
- Pros: Creates a much more stable and robust meringue because the hot sugar syrup partially cooks and stabilizes the egg white proteins. It’s less prone to collapsing during macaronage and less sensitive to humidity. Often yields more consistent results with smoother shells and more reliable feet development. The shells may also be slightly stronger.
- Cons: More complex process involving cooking sugar syrup to a precise temperature, requiring a reliable candy thermometer and careful handling of the hot syrup. More steps involved.
Which Method Should You Choose? Both can produce beautiful macarons. Many find the Italian method more reliable and consistent once mastered, especially in humid conditions. However, the French method is simpler to start with if you don’t own a candy thermometer or prefer fewer steps. Success with either method relies heavily on precision in measurement and technique, particularly the next crucial stage: macaronage.
The Crucial Step: Macaronage (Folding Technique)
This is it. The make-or-break stage. Macaronage is the French term for the process of incorporating the dry ingredients (sifted almond flour and powdered sugar) into the prepared meringue (either French or Italian). The goal is delicate: you need to fold just enough to combine the ingredients and deflate the meringue to the correct consistency, but not so much that you knock out too much air.
- The Technique: Use a large, wide, flexible spatula. Add the dry ingredients to the meringue (often in 2 or 3 additions if using the French method). The motion involves scraping around the edge of the bowl, then bringing the spatula down through the middle of the mixture, pressing gently against the side of the bowl as you complete the fold. This combines folding with a gentle pressing/smearing action needed to deflate the meringue appropriately. Rotate the bowl between folds.
- The “Lava Test” (Judging Consistency): How do you know when to stop? The batter is ready when it reaches the “lava” or “ribbon” stage. Lift the spatula; the batter should flow off it slowly but continuously in a thick, glossy ribbon that takes about 10-20 seconds to slowly sink back into the surface of the batter in the bowl.
- Under-mixed: Batter is too thick and fluffy, breaks off the spatula in clumps, doesn’t flow smoothly, holds distinct peaks. Result: Pointy or lumpy shells, potentially hollow interiors, poor feet development. Fix: Needs more folds! Continue folding gently, checking consistency frequently.
- Over-mixed: Batter is too thin and runny, flows off the spatula very quickly like water, ribbon disappears almost instantly. Result: Shells will spread too much during piping and baking, become flat, likely have no feet, and might look oily or dull. Fix: Unfortunately, over-mixed macaron batter is generally considered unsalvageable.
- The Importance of Observation: There’s no magic number of folds (it can vary from 30 to well over 70 depending on meringue stability, batch size, and technique). You must learn to recognize the correct consistency by observation – the lava test is key. Fold carefully, checking often, especially as you get close. It’s easier to add a few more folds than to fix over-mixing.
Piping, Resting, and Baking Precisely
Once the macaronage is perfect, precision continues to be key.
- Piping: Transfer the batter to a piping bag fitted with a medium plain round tip (around ¼ to ½ inch, or 8-12mm diameter). Line baking sheets with parchment paper or silicone baking mats (Silpats often work well, providing insulation). Hold the piping bag perpendicular to the baking sheet, about half an inch above the surface. Apply steady pressure to pipe uniform rounds (typically 1 to 1.5 inches / 2.5-4 cm in diameter). Stop pressure abruptly and flick the tip quickly sideways to minimize peaks. Leave adequate space between shells for air circulation. Using a printed template under your parchment paper can help ensure uniform size.
- Tapping the Tray: Once piped, tap the baking sheet firmly against the countertop several times (e.g., 5-10 firm taps). This helps release any large trapped air bubbles (which can cause shells to crack during baking) and encourages the batter to settle into smooth rounds. Pop any remaining visible surface bubbles gently with a toothpick.
- Resting/Drying (Skin Formation): This is another critical, non-negotiable step. Let the piped macarons sit undisturbed at room temperature. The goal is for them to develop a dry, matte skin on their surface. This can take anywhere from 30 minutes to over an hour, sometimes even longer, depending heavily on the humidity in your kitchen (longer time needed in high humidity). Test by gently touching the surface of a macaron with your fingertip; if it no longer feels sticky and your finger comes away clean, the skin has formed. Why is this essential? This dry skin forces the batter to rise downwards and outwards at the base when it hits the oven heat, creating the characteristic ruffled “feet.” Without a proper skin, the shells might crack on top or fail to develop feet.
- Baking: Oven temperature and time are crucial and can vary significantly between ovens. Preheat accurately (use an oven thermometer!). Bake one sheet at a time in the center rack. Common temperature ranges are 300-325°F (150-165°C), but some recipes go lower or slightly higher. Bake for approximately 12-18 minutes. Rotate the baking sheet halfway through for even baking. Shells are done when the tops are set and look matte, and the feet do not wiggle significantly when the shell is gently nudged. Avoid opening the oven door too early. It’s better to slightly overbake (drier) than underbake (hollow/sticky). Let the macarons cool completely on the baking sheet before attempting to remove them.
Troubleshooting Common Macaron Maladies
- Cracked Shells: Oven too hot; large air bubbles not tapped out; under-mixed batter; skin didn’t form properly (not rested long enough); unstable meringue.
- No Feet / Spread Too Flat: Batter over-mixed (too runny); skin didn’t form (not rested long enough); oven temperature too low initially.
- Hollow Shells: Often indicates under-baking (most common cause); oven temp too low; unstable meringue (under/over-whipped); over-mixed batter collapsing internally during bake.
- Lopsided or Pointy Shells: Uneven piping technique (hold bag straight!); under-mixed batter (too stiff to settle); oven has strong convection fan blowing them sideways (try rotating pan more frequently or blocking vent slightly).
- Wrinkled or Blotchy Tops: Often related to oily/damp almond flour; high humidity during resting/baking; potential over-mixing; oven temperature fluctuations.
- Sticking to Parchment/Mat: Almost always means they are under-baked. Let cool completely before attempting removal. If still stuck, they likely needed more time in the oven.
Filling & Maturing: The Final Step to Perfection
- Cool Completely: Never attempt to fill warm macarons; they will likely break.
- Pair and Fill: Match cooled shells by size. Pipe a generous dollop of your chosen filling (ganache, buttercream, curd, jam – ensure it’s not too wet) onto the flat side of one shell, then gently sandwich it with its partner shell.
- Maturation (Crucial!): This step transforms good macarons into great ones. Place the filled macarons in an airtight container and refrigerate them for at least 24 hours, sometimes even 48 hours, before serving. During this “maturing” period, moisture from the filling permeates the crisp shells, softening the interior to achieve that signature slightly chewy texture while the outer shell remains delicate. Flavors also meld beautifully. Don’t skip this step! Bring macarons to room temperature for about 15-20 minutes before serving for the best texture and flavor.
Conclusion: Patience, Precision, and Practice
French macarons have earned their fickle reputation, demanding precision at every stage – from accurately weighing ingredients and achieving a stable meringue, through the critical judgment required during macaronage, to the patient resting and controlled baking. Troubleshooting is an inherent part of the learning process; don’t be discouraged by initial setbacks.
Focus on mastering one step at a time. Weigh your ingredients meticulously. Learn to recognize the signs of a perfect meringue and, most importantly, the “lava flow” consistency of correctly folded macaron batter. Be patient during the resting stage, ensuring a proper skin forms. Control your oven temperature accurately. And don’t forget the crucial maturation period in the fridge. While challenging, the reward of successfully baking a batch of beautiful, delicious macarons – with smooth shells, proud feet, and that perfect chewy texture – is immense and a true mark of developing pastry skill. With patience, precision, and practice, you absolutely can tame this famously fickle cookie.