Imagine pulling a loaf of stunning, crusty, artisan-style bread from your oven – complete with those beautiful, irregular holes in the crumb – and knowing that you achieved it with almost laughably minimal effort. No strenuous kneading, no complicated folding schedules, just a simple mix, a long wait, and a bake. Sounds too good to be true? Welcome to the revolutionary and remarkably accessible world of no-knead bread.
For many aspiring bakers, the traditional process of kneading dough can be a significant hurdle. It can seem time-consuming, physically demanding, and technically intimidating. This perception prevents countless people from experiencing the joy of baking their own delicious bread at home. But pioneered and popularized by bakers like Jim Lahey, the no-knead method flips the script entirely, proving that incredible bread doesn’t necessarily require intensive labor. Let’s explore this path to “no-knead nirvana,” understand the simple science that makes it work, outline the basic technique, and discover how you can achieve phenomenal results with surprisingly little hands-on time.
The Science of Slacking Off: How No-Knead Works
How can you possibly develop the necessary gluten structure for good bread without kneading? The secret lies in leveraging two key factors: high hydration and time.
- High Hydration (Very Wet Dough): No-knead recipes typically employ a significantly higher percentage of water relative to flour compared to traditional kneaded doughs. Hydration levels often range from 75% up to 85% or even higher. This high water content does several things:
- It fully hydrates the flour proteins (glutenin and gliadin) much more easily than in a stiffer dough.
- It creates a very fluid environment where protein molecules can move around and find each other more readily.
- Long, Slow Fermentation (Time Does the Work): Instead of relying on the mechanical action of kneading to force gluten proteins to align and form bonds, the no-knead method utilizes an extended fermentation period (typically 12 to 24 hours at room temperature). During this long wait:
- Enzymatic Activity: Natural enzymes (amylase and protease) in the flour have ample time to break down starches into simple sugars (feeding the yeast) and to condition the proteins.
- Yeast Activity: A very small amount of yeast is typically used. Over the long fermentation, it slowly consumes the sugars and produces CO2 gas.
- Passive Gluten Development: As the yeast produces gas bubbles, these bubbles slowly expand and move within the very wet dough. This gentle, continuous internal movement, combined with the high hydration allowing protein mobility and enzymatic action, gradually stretches and aligns the gluten proteins over many hours, forming a surprisingly strong and elastic network without any physical kneading. Some gentle folding during the process can further enhance this structure, but the core development happens passively.
The result is a fully fermented dough with a well-developed (though often less regularly structured than kneaded dough) gluten network capable of trapping gas, all achieved primarily through the power of time and water.
The Basic No-Knead Method (Jim Lahey Style)
The technique that sparked the no-knead revolution is remarkably simple. Here’s a typical outline:
Ingredients (Simplicity is Key):
- Flour: Bread flour often gives slightly better structure, but all-purpose flour works well too.
- Water: Room temperature or slightly cool.
- Salt: For flavor and controlling fermentation.
- Yeast: A very small amount of instant yeast (often just 1/4 teaspoon for a standard loaf). Active dry yeast can sometimes be used, potentially dissolved in the water first.
(Note: While original recipes often used volume, using a digital scale for flour and water provides much more consistent results due to the importance of hydration levels).
The Process:
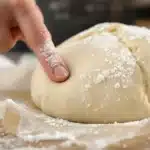
- Mix (Briefly!): In a large bowl, whisk together the flour, salt, and tiny amount of instant yeast. Add the water. Using a wooden spoon or spatula (or even just your hand), stir until all the dry flour is incorporated and a very wet, sticky, shaggy dough forms. This should only take 30-60 seconds. Do NOT knead! The dough will look messy and undeveloped – that’s correct.
- Long Fermentation (The Magic Happens): Tightly cover the bowl with plastic wrap or a lid. Let the bowl sit undisturbed at room temperature (a cool room temp around 68-72°F / 20-22°C is ideal, but it’s forgiving) for a long period, typically 12 to 18 hours, though some recipes go up to 24 hours. During this time, the dough will rise significantly, become very bubbly, and develop a webby, glutenous appearance when stretched slightly. It will also likely smell pleasantly fermented, perhaps slightly alcoholic.
- “Shaping” (Gentle Handling): Generously flour your work surface. Carefully scrape the very bubbly, jiggly, sticky dough out of the bowl onto the flour. Sprinkle the top of the dough with more flour. With well-floured hands, gently fold the dough over onto itself once or twice (like folding a letter – top down, bottom up, side to side). Do not punch down or knead. Cover the dough loosely (e.g., with the inverted bowl or plastic wrap) and let it rest on the floured surface for about 15-30 minutes. After resting, use well-floured hands or a bench scraper to quickly and gently coax the dough into a rough ball shape, trying to create a little surface tension by tucking the edges underneath.
- Final Proof (Relatively Short): Place the shaped dough, typically seam-side up, onto a piece of parchment paper heavily dusted with flour, cornmeal, or bran (this will become the bottom of your loaf and helps prevent sticking). Alternatively, place it seam-side up in a heavily floured proofing basket (banneton) or bowl lined with a well-floured cloth. Cover loosely and let it proof for about 1 to 2 hours. It won’t necessarily double like traditional dough but should look puffy and pass the poke test (indentation springs back slowly).
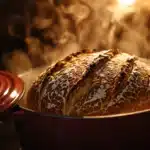
- Baking (Dutch Oven Recommended): About 30-60 minutes before the end of the final proof, place a heavy, covered Dutch oven (or combo cooker) into your oven and preheat it to a high temperature (usually 450-500°F / 230-260°C). When ready to bake, carefully remove the extremely hot pot from the oven. Remove the hot lid. Carefully lift the proofed dough using the parchment paper as a sling (or gently invert it from its banneton onto parchment or directly into the pot if well-dusted) and lower it into the hot Dutch oven. Put the hot lid back on immediately. Bake covered for typically 30 minutes. Then, remove the lid (watch for steam!) and continue baking uncovered for another 15-25 minutes, until the crust is deeply browned and the internal temperature is correct.
- Cool Completely: Immediately transfer the baked loaf from the hot pot to a wire cooling rack. Let it cool completely (at least 1-2 hours) before slicing to allow the crumb structure to set.
The Allure of Effortless Bread: Pros of No-Knead
Why has this method become so popular?
- Minimal Effort: The actual hands-on time is incredibly short – maybe 10-15 minutes total for mixing and shaping.
- No Kneading Skill Required: It completely bypasses the potentially intimidating or physically demanding step of kneading, making artisan-style bread accessible to everyone.
- Fantastic Results: Despite the lack of effort, no-knead methods consistently produce bread with a beautiful, open, chewy crumb and a remarkable crisp, crackly crust, especially when baked in a Dutch oven.
- Deep Flavor Development: The long, slow fermentation period allows ample time for complex flavors to develop, often rivaling those found in sourdough or breads made with pre-ferments.
- Forgiving Nature: The process is generally less sensitive to exact timings and temperatures than some traditional bread methods, making it quite forgiving for beginners.
Things to Consider: Cons & Limitations
While fantastic, the no-knead method isn’t perfect for every situation:
- Requires Advance Planning: The biggest drawback is the need for the long 12-24 hour fermentation. You must start the dough the day before you intend to bake. It doesn’t work for spur-of-the-moment bread baking.
- Handling Sticky Dough: While there’s no kneading, the brief shaping stage involves handling very wet, slack dough, which can still feel tricky or messy for absolute beginners until they get used to it.
- Specific Texture: It excels at producing a rustic loaf with an open, irregular, chewy crumb and a crisp crust. If you’re aiming for a very tight, uniform crumb (like a classic sandwich loaf) or a very soft crust, other methods might be more suitable.
- Less Shaping Control: The slack nature of the dough makes achieving highly defined shapes (like intricate rolls or complex braids) difficult. Boules and simple rustic loaves are its forte.
- Dutch Oven Highly Recommended: While you can bake no-knead bread on a stone or sheet pan with alternative steaming methods, the contained environment of a preheated Dutch oven (or similar covered pot/cloche) provides the ideal combination of intense heat and trapped steam that allows this wet dough to rise dramatically and develop its signature crust most effectively.
Tips for No-Knead Success
- Use a Scale: Ensure consistent hydration by weighing your flour and water.
- Just Combine: Resist the urge to mix beyond the point where no dry flour remains.
- Use a Large Enough Bowl: Allow room for the dough to triple or even quadruple during its long rise.
- Handle Gently: During the brief shaping step, use a light touch. Think folding and tucking, not punching or kneading, to preserve the trapped gases.
- Flour Power (for Shaping): Don’t be shy with flour on your hands and work surface only during the shaping stage to manage the stickiness. Rice flour is excellent for dusting parchment or bannetons to prevent sticking during proofing.
- Preheat Power: Ensure your oven AND Dutch oven (if using) are thoroughly preheated for that essential initial blast of heat.
- Experiment (Later): Once comfortable with the basic method, try adding mix-ins (seeds, herbs, cheese – add during the initial mix or fold in gently before proofing) or incorporating some whole wheat flour (you might need to slightly increase the water).
Conclusion: Effortless Artisan Bread is Possible!
The no-knead bread method truly revolutionized home baking, proving that incredible, crusty, open-crumbed artisan bread doesn’t require hours of kneading or specialized skills. By cleverly substituting time and high hydration for mechanical work, it allows natural processes to develop robust flavor and structure with astonishingly minimal effort from the baker.
While it requires planning due to the long fermentation and produces a specific rustic style, its ease of execution and consistently impressive results make it an ideal entry point for aspiring artisan bakers, a fantastic option for busy schedules, and a satisfying technique even for experienced bakers. If the thought of kneading has held you back, or if you simply crave delicious, crusty bread with very little fuss, embrace the simplicity and step into the rewarding world of no-knead nirvana.