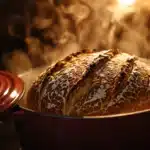
You see it on practically every stunning loaf of artisan bread: a dramatic slash across the surface, perhaps pulled back to reveal a crispy, raised edge often called an “ear.” This deliberate cutting of the dough’s surface just before baking, known as scoring, is more than just a decorative flourish. While it certainly contributes to the professional, handcrafted aesthetic we admire, scoring serves critical functional purposes that directly impact how your bread behaves in the intense heat of the oven.
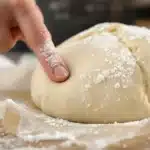
For aspiring bakers, taking a sharp blade to their beautifully proofed dough can feel counterintuitive and nerve-wracking. What if you deflate it? What if the cut is jagged and ugly? Understanding why we score and learning the proper techniques can transform this step from a moment of anxiety into an act of confident control, helping your loaves not only look more professional but also achieve a better rise and structure. Let’s unveil the secrets behind effective scoring.
Why Score? The Purpose Behind the Cut
Scoring isn’t just about making patterns; it’s about physics and controlling the uncontrollable force of oven spring.
- Controlling Expansion (Oven Spring): When dough hits the hot oven, the yeast inside undergoes a final frenzy of activity, producing a rapid burst of CO2. Simultaneously, existing gases and water vapor within the dough expand dramatically due to the heat. This rapid inflation is called “oven spring.” The dough’s surface, or crust, begins to set quickly in the heat. Scoring creates designated weak points in this setting crust. Without these controlled vents, the immense internal pressure would cause the dough to burst open randomly along its naturally weakest points, often resulting in irregular, unsightly rips and potentially a misshapen loaf. Scoring directs where the loaf expands, allowing for a controlled and often more aesthetically pleasing opening.
- Allowing Maximum Rise: By providing an intentional “escape route” for the expanding gases, scoring allows the loaf to achieve its maximum possible volume during oven spring. A non-scored loaf might be restricted by its rapidly forming crust, limiting its upward expansion.
- Improving Crumb Structure: The way a loaf expands along a score line can influence the internal crumb structure, sometimes contributing to a more open texture immediately beneath the cut. Controlled expansion generally promotes a more desirable overall crumb compared to uncontrolled bursting.
- Aesthetics (The Baker’s Signature): Function aside, scoring is undeniably an artistic element of bread making. It allows bakers to add a personal touch and visual appeal to their loaves. Simple slashes, intricate cross-hatching, or patterns like wheat stalks can become a baker’s signature or even indicate the type of bread within. A well-executed score simply makes the loaf look more finished and professional.
Tools of the Trade: What to Use for Scoring
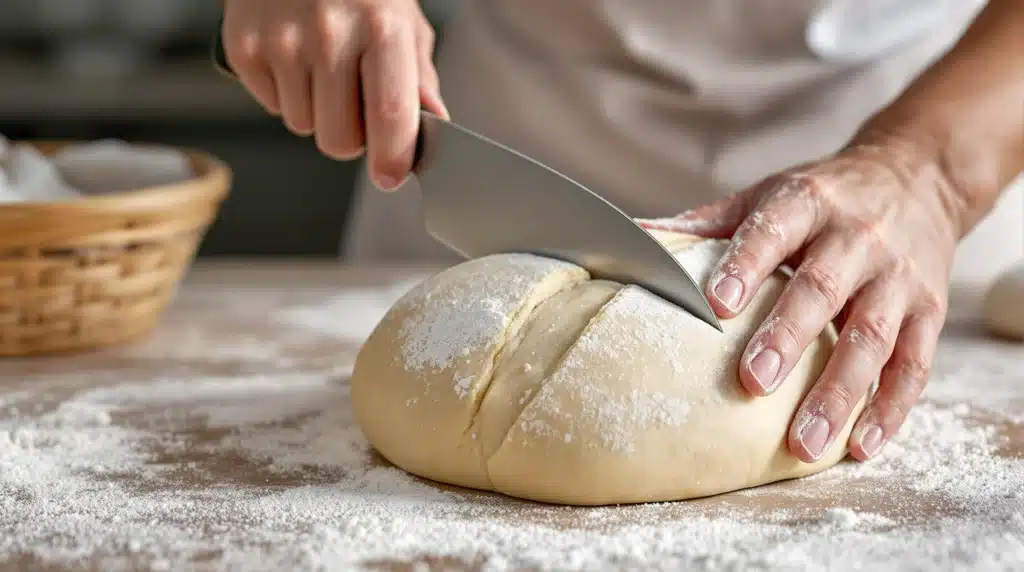
The absolute key requirement for effective scoring is an extremely sharp blade. A dull blade will drag, tear, and compress the delicate dough rather than making a clean incision.
- Bread Lame (pronounced “LAHM”): This is the tool preferred by most serious bread bakers. It’s essentially a handle designed to securely hold a standard, double-edged razor blade.
- Pros: Razor blades are incredibly thin and sharp, allowing for clean, effortless cuts with minimal drag. The handle provides good control and allows the baker to easily adjust the blade angle (crucial for creating an “ear”). Blades are inexpensive and easily replaceable, ensuring you always have a perfectly sharp edge. Lames come with straight or curved handles; curved lames are often favored for making the shallow-angled cuts needed to achieve a pronounced ear.
- Cons: It’s a specialized tool you need to purchase (though many affordable options exist). Requires careful handling and storage of sharp razor blades.
- Very Sharp Knife: If you don’t have a lame, a very sharp, thin blade can work, especially for simpler patterns.
- Options: A scalpel or craft knife (like an X-Acto knife) with a fresh blade can be effective. Some bakers have success with an exceptionally sharp paring knife or even a specific type of serrated knife (though smooth blades are generally better).
- Cons: Most kitchen knives, even sharp ones, have thicker blades than a razor, which increases the risk of dragging the dough. It’s harder to achieve the shallow angle needed for an ear. Requires dedicating a knife solely for scoring and keeping it meticulously sharp.
- Kitchen Shears / Scissors: Useful for specific decorative effects, particularly on round loaves or softer doughs.
- Pros: Easy and safe to handle. Good for creating patterns of multiple small snips around the edge of a boule or cutting chevron/diamond patterns on top.
- Cons: Cannot create the classic clean slash or the undercut necessary for forming an ear. Primarily decorative rather than offering optimal expansion control for all loaf types.
- What NOT to Use: Dull kitchen knives, butter knives, steak knives, etc. These will mangle the dough surface, compress the structure, potentially deflate your carefully proofed loaf, and hinder rather than help oven spring.
Scoring Technique: Angle, Depth, and Speed
How you make the cut is just as important as the tool you use.
- Timing: Score your dough immediately before it goes into the preheated oven. Proofed dough is fragile and full of gas; scoring it too early allows time for the cuts to close up slightly or for the dough to begin deflating before the oven’s heat can provide lift.
- Confidence and Speed: This is crucial! Hesitation is the enemy of a clean score. A slow, tentative cut will drag the dough. Aim for a single, swift, decisive, and fluid motion. Commit to the cut without sawing back and forth. Imagine drawing a line with purpose.
- Depth: The ideal depth is typically ¼ to ½ inch (about 0.5 to 1.5 cm).
- Too Shallow: The cut won’t be deep enough to create a proper vent, and the crust may still burst elsewhere, or the score won’t open up much (“bloom”).
- Too Deep: Cutting too deeply can sever too much of the gluten network, potentially causing the loaf to spread excessively or even deflate before it gets significant oven spring. It can also affect the internal crumb structure negatively near the cut.
- Adjustment: Consider the dough’s proofing level. Slightly under-proofed dough has more upward push (oven spring) and can often handle a slightly deeper score. Fully proofed or slightly over-proofed dough is more delicate and benefits from a shallower score to prevent collapse. Higher hydration dough might also need a slightly shallower touch.
- Angle of the Blade: This dramatically affects how the score opens and whether you achieve that coveted “ear” (the proud, crisp flap of crust along one side of the score).
- Perpendicular Cut (90° angle to surface): Cutting straight down into the dough creates a vent that allows for relatively even expansion on both sides of the cut. It generally doesn’t produce a pronounced ear. Good for symmetrical patterns like cross-hatching (#) or a simple cross (+).
- Shallow Angle Cut (~30-45° angle to surface): Holding the lame or blade almost parallel to the dough’s surface and making a slicing cut slightly under the skin is the key to creating an ear. This undercutting allows one side of the cut (the flap) to lift away and crisp up dramatically during oven spring as the loaf expands primarily from underneath it. This is the preferred angle for the classic single slash on boules and bâtards, and essential for the multiple overlapping cuts on baguettes.
- Handling the Dough: Minimize handling of the fully proofed dough right before scoring. Ensure it’s resting on its final baking surface (parchment paper on a peel, directly in a preheated pot if using parchment) or still securely in its proofing basket (if scoring before carefully flipping it out). Trying to score a wobbly, unstable loaf is difficult. Having the dough slightly chilled from a cold proof (retardation) makes the surface significantly firmer and much easier to score cleanly.
Common Scoring Patterns: From Simple to Decorative
Once you grasp the basic technique, you can explore different patterns:
- Single Slash: The workhorse. A simple, often slightly curved slash across the top of a boule or down the length of an oval loaf (bâtard) or baguette. Use a shallow angle (~30-45°) for an ear.
- Cross Hatch / Diamond Pattern (#): A grid pattern. Make several parallel diagonal slashes across the loaf, then rotate the loaf (or change your angle) and make another set of parallel diagonal slashes perpendicular to the first set. Usually done with a straighter (more perpendicular) blade angle for even opening. Looks great on round loaves (boules).
- Cross Pattern (+ or X): Two simple cuts intersecting in the center of a round loaf. Functional and classic. Use a perpendicular angle.
- Square Pattern: Four cuts forming a square shape on top of a round loaf. Creates distinct quadrants as it opens.
- Wheat Stalk (Épi – for baguettes or long loaves): A series of overlapping V-shaped cuts made down the length of the loaf, often using scissors held at a steep angle, resembling kernels on a stalk of wheat. Both decorative and functional.
- Scissor Cuts: Using sharp kitchen shears to make multiple small snips around the perimeter or across the top of a round loaf can create interesting textured or spiky effects.
Start with simple patterns like the single slash or cross until you feel comfortable with the motion and depth, then gradually experiment with more intricate designs.
Tips for Scoring Success
- SHARP Blade is Paramount: Worth repeating! A dull blade is the primary cause of poor scores. Replace disposable razor blades frequently (they dull faster than you think on dough). Keep dedicated knives extremely sharp.
- Score Chilled Dough: If your recipe allows for cold proofing (retarding), scoring the cold, firm dough just before baking is significantly easier and yields cleaner cuts.
- Light Dusting (Optional): A very light dusting of flour (preferably rice flour, as it doesn’t brown as much) applied to the loaf’s surface just before scoring can sometimes help the blade glide more easily and makes the final pattern contrast more visually against the dark crust.
- Wet the Blade? (Experiment): Some bakers find dipping the tip of their lame or knife in water or oil helps it glide through sticky or high-hydration dough more smoothly. Try it and see if it works for you.
- Be Decisive: Commit to your cut. A quick, confident motion yields better results than a slow, hesitant one. Visualize the cut before you make it.
- Practice: Don’t expect perfection immediately. Like shaping, scoring is a skill that improves with practice. Analyze your results: Did the score open well? Was it too deep/shallow? Was the cut clean? Adjust your technique next time.
When NOT to Score?
While essential for most crusty artisan loaves, scoring isn’t always necessary or desirable:
- Some softer, enriched breads baked in loaf pans (like standard sandwich bread or challah) rely on the pan for structure and don’t require scoring for expansion control.
- Certain flatbreads are typically not scored.
- Some rustic recipes might intentionally skip scoring to encourage natural, irregular bursting for a specific aesthetic.
- Always follow your specific recipe’s instructions regarding scoring.
Conclusion: Your Signature on the Loaf
Scoring bread dough is a beautiful blend of art and science. Functionally, it’s a crucial technique for controlling the explosive power of oven spring, ensuring your loaf rises to its full potential with grace rather than chaos. Aesthetically, it’s your opportunity to add a personal, professional touch, transforming a simple round or oblong into a visually stunning centerpiece.
By understanding the purpose behind the cuts, choosing the right (sharp!) tool, and mastering the techniques of depth, angle, and confident speed, you can move beyond hesitant scratches to creating scores that allow your bread to bloom beautifully in the oven. Start simple, practice consistently, don’t fear chilled dough, and soon you’ll be wielding your lame or knife with confidence, unlocking the secrets to loaves that look as incredible as they taste.