Scroll through photos of stunning, crusty artisan bread baked at home, and you’ll frequently spot a common co-star in the process: a heavy, lidded pot, most often a colorful, enamel-coated cast iron Dutch oven. These pots have surged in popularity alongside the boom in home bread baking, with countless recipes specifically calling for their use. But what makes this seemingly simple cooking vessel so effective for bread? Is it just a trend, or is there real substance behind its reputation? And perhaps most importantly for an aspiring baker building their toolkit, is investing in one truly necessary, or is it just hype?
Dutch ovens can be hefty, both in weight and price, leading beginners to wonder if they’re essential gear or an optional luxury. Let’s delve into the world of Dutch oven bread baking, explore the science that makes them work so well, understand how to use one effectively, weigh the pros and cons, and ultimately tackle the question: Is this “mighty” pot really a bread baker’s best friend?
What is a Dutch Oven (in a Baking Context)?
While versatile for stews, braises, and roasts, when bakers talk about using a Dutch oven for bread, they typically mean a heavy, thick-walled cooking pot equipped with a tight-fitting lid. The most common and effective material for this purpose is cast iron, which comes in two main finishes:
- Bare Cast Iron: Requires seasoning to prevent rust and create a non-stick surface. Excellent heat retention.
- Enamel-Coated Cast Iron: Coated with a layer of smooth, durable enamel (like brands Le Creuset, Staub, Lodge Enameled). Easier to clean, doesn’t require seasoning, non-reactive. This is the most popular type for bread baking due to ease of use and maintenance.
While pots made from other materials exist, the key properties of cast iron – its heavy mass, excellent heat retention, and the ability to create a seal with its heavy lid – are what make it particularly well-suited for transforming dough into bakery-quality loaves in a home oven.
The Science: Why Dutch Ovens Excel at Bread Baking
The magic of baking bread in a Dutch oven boils down to two key scientific principles it masterfully controls within your standard home oven: steam generation and even heat distribution.
1. Trapping Steam (The Mini Steam Oven Effect): Professional bakeries use expensive deck ovens with steam injection systems. Why? Steam during the initial phase of baking is crucial for artisan-style crusts.
- The Problem at Home: Conventional home ovens are vented and designed to let moisture escape, making it difficult to create and maintain the intensely steamy environment needed.
- The Dutch Oven Solution: When you place your relatively cool, moist dough inside a preheated Dutch oven and immediately cover it with the heavy, tight-fitting lid, the moisture evaporating from the dough itself gets trapped inside the pot. This confinement creates a personal steam chamber surrounding your loaf during the first critical 15-30 minutes of baking.
- The Benefits of Steam: This trapped steam works wonders:
- Delays Crust Formation: It keeps the surface of the dough moist and pliable for longer, allowing the loaf to expand to its maximum potential (achieving great “oven spring”) before the crust hardens and restricts the rise.
- Improves Crust Quality: Steam helps gelatinize starches on the dough’s surface. Later, when the lid is removed and the steam dissipates, these gelatinized starches dry out and contribute to a shinier, thinner, crispier, and more deeply colored crust. (Think back to our Oven Insights on steam).
2. Even, Radiant Heat & Heat Retention: Home ovens can suffer from fluctuating temperatures and hot spots. A heavy Dutch oven helps mitigate these issues.
- The Problem at Home: Inconsistent oven temperatures can lead to uneven baking, poor rise, and unpredictable results.
- The Dutch Oven Solution: The thick, heavy walls of a cast iron Dutch oven absorb a tremendous amount of heat during the preheating phase and retain that heat exceptionally well. It then radiates this heat intensely and evenly onto the dough from all sides (including the lid).
- The Benefits of Heat:
- Consistent Heat: Provides a stable, consistently hot environment around the dough, promoting a strong, rapid initial rise (oven spring).
- Even Baking & Browning: Reduces the impact of oven hot spots, leading to more uniformly baked and browned loaves.
- Temperature Buffering: Its thermal mass helps prevent the oven temperature from plummeting drastically when you open the door briefly to load the dough.
- Excellent Bottom Heat: The hot bottom of the pot provides strong conductive heat, similar to baking on a preheated stone or steel, ensuring the bottom crust is well-baked and crisp.
By perfectly managing both steam and heat, the Dutch oven essentially mimics the conditions of a professional deck oven within your home oven.
How to Bake Bread in a Dutch Oven: The Basic Process
While specific recipes vary, the general technique for baking crusty bread in a Dutch oven follows these steps (always prioritize safety – these pots get extremely hot!):
- Preheat Pot and Oven: Place the empty Dutch oven, including its lid, onto a rack in your cold oven. Preheat the oven to the high temperature specified in your recipe (often 450°F to 500°F / 230°C to 260°C). Allow the pot to preheat with the oven for at least 30 minutes, and preferably 45-60 minutes, after the oven reaches temperature. This ensures the heavy pot is thoroughly heat-soaked.
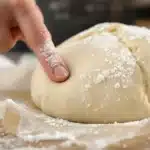
- Prepare Dough: While the pot preheats, ensure your dough has completed its final proof and is ready for baking (use the poke test!). If proofing in a banneton or bowl, have it ready to transfer.
- Transfer Dough (Use Extreme Caution!): This is the trickiest part. Carefully remove the extremely hot Dutch oven from the oven using reliable, heavy-duty oven mitts. Place it on a heatproof surface. Carefully remove the hot lid (set it aside safely). Gently invert or slide your proofed dough into the hot pot. Using a parchment paper sling under the dough makes this transfer much easier and safer, and prevents sticking. If not using parchment, you might lightly dust the bottom of the hot pot with cornmeal or semolina just before adding the dough. Quickly score the top of the dough with a lame or sharp knife if your recipe requires it.
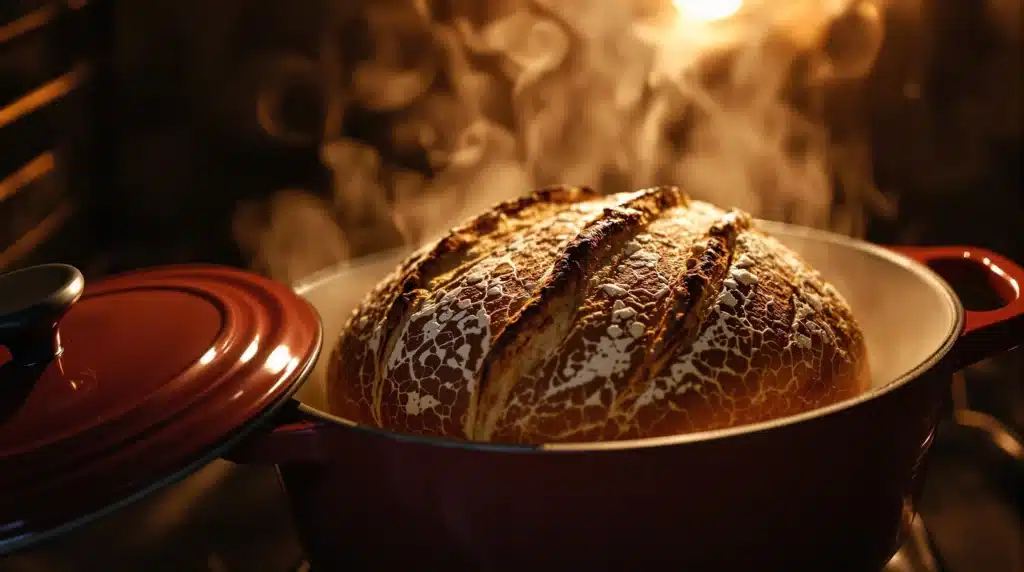
- Cover and Bake (Steam Phase): Working quickly but carefully, immediately place the hot lid back onto the Dutch oven. Using your oven mitts, carefully return the covered pot to the hot oven. Bake for the duration specified in the recipe for the covered phase (typically 15-30 minutes). During this time, the trapped steam is doing its magic.
- Uncover and Finish Baking (Browning Phase): Carefully remove the hot lid from the Dutch oven (be prepared for a blast of steam!) and set it aside or leave it in the oven off to the side. Continue baking the loaf uncovered. This allows the steam to escape and the crust to dry out, harden, brown deeply, and become crisp. Bake until the crust is a rich golden-brown and an instant-read thermometer inserted into the center registers the correct internal temperature for doneness (usually 190-210°F / 88-99°C for lean doughs).
- Cooling is Crucial: Carefully remove the finished loaf from the hot Dutch oven (the parchment sling is very helpful here, otherwise use sturdy spatulas) and immediately transfer it to a wire cooling rack. Do not cool the bread in the Dutch oven, as trapped moisture will make the bottom crust soggy. Allow the bread to cool completely (at least an hour, preferably longer) before slicing to allow the internal structure to set. Let the heavy pot cool down slowly and completely before cleaning.
Pros and Cons of Using a Dutch Oven for Bread
Like any tool, Dutch ovens have their advantages and disadvantages for bread baking.
Pros:
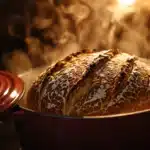
- Superior Crust: Consistently produces loaves with fantastic crusts – often thin, crackly, deeply colored, and shiny – mimicking professional results.
- Excellent Oven Spring: The trapped steam allows for maximum loaf volume and an airy crumb.
- Even Baking: The radiant heat promotes uniform cooking and browning.
- Simplicity: Offers the easiest and most reliable way to create adequate steam in a home oven without complicated setups.
- Versatility: A high-quality Dutch oven is also fantastic for soups, stews, braises, roasts, and even deep frying, making it a multi-purpose kitchen investment.
Cons:
- Cost: Enamel-coated cast iron Dutch ovens from premium brands can be quite expensive. Bare cast iron is cheaper but requires more maintenance.
- Weight & Handling: They are extremely heavy, especially larger sizes. Maneuvering a preheated, 500°F cast iron pot requires strength, care, and very good oven mitts. It can be a safety concern.
- Size & Shape Limitation: You are limited to baking loaves that fit inside your pot, typically round “boules” or smaller oval “bâtards.” Not suitable for long baguettes or baking multiple loaves simultaneously.
- Extended Preheating Time: Requires a long preheat to get the heavy pot fully saturated with heat, using more energy.
- Sticking Potential: If not using parchment paper, dough can occasionally stick to the bottom, especially in non-enameled or poorly seasoned pots.
Don’t Have a Dutch Oven? Alternatives for Creating Steam
If a Dutch oven isn’t in your budget or kitchen right now, don’t despair! You can still achieve good results with other methods (though perhaps with a bit more effort):
- Baking Stone/Steel + Steam Pan: As detailed in our Oven Insights article, preheat a baking stone or steel thoroughly. Place a metal pan (cast iron skillet, broiler pan – no glass!) on a lower rack during preheating. When you load the bread onto the hot stone/steel, carefully pour hot water or ice into the steam pan to create a burst of steam.
- Clay Baker / Bread Cloche: Unglazed clay bakers (like a Romertopf), when soaked in water before preheating, release steam gradually. Purpose-built ceramic bread cloches also trap steam effectively, functioning much like a Dutch oven but are often lighter (and sometimes more fragile).
- Large Inverted Bowl: Placing a large, oven-safe stainless steel mixing bowl or roasting pan lid over your loaf on a baking stone/steel for the first 15-20 minutes can also trap steam reasonably well. Be very careful handling the hot bowl/lid.
The Verdict: Is it Truly a Bread Baker’s Best Friend?
So, back to the original question. For the specific goal of baking artisan-style, crusty loaves (like sourdough boules, no-knead breads, rustic European-style loaves) in a standard home oven, the Dutch oven is arguably the single most effective and user-friendly tool for consistently achieving superior oven spring and that coveted crackling crust. It elegantly solves the home baker’s steam problem.
However, it’s not essential for all bread baking. If your focus is primarily on softer sandwich loaves baked in loaf pans, enriched rolls, or flatbreads, a Dutch oven isn’t necessary. And as mentioned, dedicated bakers can achieve good crusty bread results using alternative steaming methods with a stone or steel, though it often requires more practice and fiddling.
Consider the Dutch oven a highly valuable, specialized piece of gear that becomes a “best friend” particularly to those bakers dedicated to mastering crusty, hearth-style loaves at home. Its effectiveness for this specific purpose is undeniable.
Conclusion: The Power of the Pot
The humble Dutch oven, particularly a heavy cast iron model, earns its “mighty” reputation in the bread baking world fair and square. By ingeniously trapping steam and providing intense, even, radiant heat, it allows home bakers to replicate key conditions of professional ovens, leading to loaves with impressive height and stunning crusts.
While its weight, cost, and size limitations are valid considerations, its ease of use and the quality of results it produces for crusty breads make it a worthwhile investment for many serious home bakers. If you don’t have one, viable alternatives exist, but require a bit more effort to manage steam effectively. Ultimately, whether the Dutch oven becomes your baking best friend depends on the types of bread you love to make. But for achieving that perfect artisan loaf at home, its power is hard to beat.